Showing posts with label vegetarian recipes. Show all posts

Thursday, September 15, 2011

Spaghetti with Fresh Pea Pesto and Fava Beans


It was delicious!

Spaghetti with Fresh Pea Pesto and Fava Beans –
Organic Seasonal Cookbook by Liz Franklin - pg. 63
Summer

Serves 4

Ingredients:

Pea Pesto:
3 cups fresh shelled peas
5 tbsp extra virgin olive oil
2 garlic cloves, crushed
3 ½ oz Parmesan Cheese, freshly grated, plus extra, shaved, for serving
2/3 cup blanched almonds, chopped
pinch of sugar

Spaghetti:
9 oz shelled fava beans
1 lb dried spaghetti
salt and pepper

Directions:
  1. For the pesto, cook the peas in a saucepan of boiling water for 2-3 minutes, or until just tender. Drain and transfer to a blender or food processor. Add the oil, garlic, and Parmesan cheese and process to a coarse paste. Add the almonds and process again. Add the sugar and season to taste with salt and pepper. Set aside.
  2. Blanch the fava beans in a saucepan of salted boiling water until just tender. Drain and let cool. Peel off the dull skins.
  3. Cook the spaghetti in a large saucepan of lightly salted boiling water according to the package directions, or until al dente. Drain, then stir in the fava beans and toss with the pesto. Add a good coarse grinding of pepper and serve immediately with shavings of parmesan cheese.


    Yum,
    ~Birdie

Friday, July 15, 2011

Watermelon Smoothies and Other Delicious Things

Well, for some amazingly wonderful reason, Beau's lovely sister... AKA my sister-in-law... decided to come over yesterday to make us dinner. Obviously I am not going to object. She made a yummy meal of mushroom rice with a shrimp, hummus, bell pepper, and spinach pita. It was scrumptious. She also brought a watermelon for us to munch on for dessert. We were too stuffed, however, to break into it so we saved it for later... which brings me to this post.


With an entire watermelon to eat between two people I wanted to get creative in how we would eat it and not waste it... because... honestly... sometimes we do that... 
So, tonight after our rice and steamed veggies (cauliflower, broccoli, and carrots) dinner I cut up the watermelon, threw it in the blender and made a few things to last us the week. Waste not, want not... that is becoming our motto... among other things.
I knew we wanted smoothies, so I took out the ice trays and set them on the table - then I noticed that one of the ice trays was almost empty (two cubes left)... which led me to watermelon ice cubes for our water during the week - yummy and refreshing!
Then I realized there was a lot of melon when you pureed it... so I poured some into a recycled juice jar we had on hand and put it in the fridge... watermelon juice... just add some water to cut the sweetness and you have yummy water throughout the day!
Lastly, I added the ice, blended, and made the smoothies for us to drink as dessert.
Who says eating healthy has to be gross? I'd say we spoiled ourselves!


Have a Watermelon Kind of Weekend,
~Birdie

Sunday, July 3, 2011

Restaurant Styled Organic Salsa.... mmmm...

There is this blog that I follow pretty much religiously. I think she is the pips. This Pioneer gal is my role model. She home schools her kids, lives on a huge cattle ranch, has a hunky husband (just like me!), has two bassett hounds and is equally obsessed with them as I am with Izzie, and she cooks, writes books, gardens, and eats delicious food. She is awesome. 


While stalking... I mean.... perusing her website I stumbled across her recipe for home made restaurant styled salsa. It seems that she is just as picky and obsessive about salsa as I am. I gave the recipe a shot a few months back and it was pretty spot on. I am a spicy kind of girl, so I added some extra kick to mine to satisfy my needs. 
Flash forward to now. While at the grocery store this morning I was struck with inspiration to make it again. Few things compare to delicious home made salsa! This time, knowing now what I know, I bought organic veggies. Yum! 
I have been trying to learn how to do things from scratch when cooking so instead of using out of the can ingredients like she suggests I bought some roma tomatoes and tossed them into a pot of water and set it to boil.
I sent my cilantro, jalapenos, and onion through my food processor and waited for the tomatoes to be soft enough to turn into tomatoey mush. 
With the tomatoes ready to make said mush. I tossed them into the food processor and made mush.
Combine all the ingredients. Throw in the spices that she suggests (mmmm cumin) and give it a stir. Because I made such a large batch I had to up the ante on the spices to make sure it all came out right. I love that I have been cooking for long enough that my measuring spoons are pretty much dust collectors. A dash of this, pinch of that, glob of this... that's how it works these days. 

After mixing the ingredients together I tossed it back into the pot to simmer. Roasted salsa is so delicious... mmmmm..... 
Once it is nice and toasty, you let it cool a moment, plop some in a nifty bowl, and dig in. As for me... I canned the rest - Three 16 oz. mason jars of salsa to put up on the shelf. Yum.
Siesta Time!
~ Birdie


Neat little find: GMO Free tortilla chips! It's a good day.
Also. Izzie isn't a fan of the pressure cooker.
Sad eyes.
Ada, however, doesn't care.
Please note my little darling's tongue... which is sticking out. That is how much she cares.

Monday, January 17, 2011

Blackbean and Corn BBQ Pizza

I discovered this recipe some time ago and I'm not really sure where I got it from. It is made for the BBQ grill, but I am slowly perfecting it for the oven. The recipe is as follows:


Yum!! Half chicken, half veggie.
Ingredients
  • 1-2 plum tomatoes, diced
  • 1 cup canned black beans, rinsed
  • 1 cup fresh corn kernels, (about 2 ears)
  • 2 tablespoons cornmeal
  • 1 pound prepared whole-wheat pizza dough
  • 1/3 cup barbecue sauce
  • 1/2 cup mushrooms, chopped
  • 1/2 cup frozen spinach, chopped and thawed
  • 1 cup shredded mozzarella, preferably smoked mozzarella
Preparation


1. Preheat grill to medium.


2. Combine tomato, beans and corn in a medium bowl. Sprinkle cornmeal onto a large baking sheet. Stretch the dough into about a 12-inch circle and lay it on top of the cornmeal, coating the entire underside of the dough.


3. Transfer the crust from the baking sheet to the grill. Close the lid and cook until the crust is puffed and lightly browned on the bottom, 4 to 5 minutes.


4. Using a large spatula, flip the crust. Spread barbecue sauce on it and quickly sprinkle with the tomato mixture and cheese. Close the lid; grill until the cheese is melted and the bottom of the crust is browned, 4 to 5 minutes.
 
Nutrition


Per serving: 316 calories; 6 g fat (3 g sat, 0 g mono); 13 mg cholesterol; 48 g carbohydrates; 3 g added sugars; 14 g protein; 4 g fiber; 530 mg sodium; 94 mg potassium.


Nutrition Bonus: Calcium (15% dv).


3 Carbohydrate Serving


Exchanges: 3 starch, 3 medium-fat meat
 
Delicious!!!
 
For the oven, I preheat the oven to 350* and spread the dough out in a cookie sheet. I place the dough in the oven for about 5-10 minutes to let it cook. I take it out, flip the dough, and continue the process as it states in the above recipe. I also add some BBQ sauce to the tomato mix as it keeps it nice and moist while baking. Be careful not to add to much, otherwise it will be an overpowering taste. I then place it back into the oven and cook it for an additional 10-20 minutes, checking on it every so often to make sure it isn't getting burned. When it is ready to come out, I let it cool for a little bit and then start slicing! We like to dip it in ranch! Yum!!! (But it tastes great on its own!)
 
*For this batch Beau wanted chicken so I added some pre-cooked chicken breasts that he had picked up from the store the other night. I just mixed it in with the tomato mixture in a separate bowl and put it on the dough. Easy peasy.
 
Enjoy!
~ Birdie

Friday, November 26, 2010

Gobble-less Recipes


Good morning after Thanksgiving! If you're like me you'll have just rolled out of bed, our stomachs still aching from all the food the evening before... however, if you're like those crazy folks who participate in Black Friday sales and shopping, well I suppose there is no hope for you. I had intended to write a post dedicated to my recipes last night, but after three pieces of pie and enough stuffing to feed an army, I decided sleep was my better bet. So here I am, 11 AM, typing away on my computer to make due my promise to myself (and Mother-in-Law). We spent a lovely dinner at our Aunt's house with good company, delicious food, and festive (Christmas) music. Their Christmas Tree was already up and decorated to perfection, lovely and snowy... I wanted to eat the branches the "snow" looked so puffy and fresh! My Beau and I contributed three dishes to the feast - a Chickpea Bruschetta Appetizer, Wild Rice Stuffing, and two Double Layer Pumpkin Pie Cheesecakes. Recipes of which are below:

 
Chickpea Bruschetta
Serves 2 (as a dinner)
It's yummier than it looks, promise.
Time: 10 minutes prep / chill in fridge for 20+ minutes

Ingredients
1 cup cooked or canned chickpeas (garbanzo beans)
4 tablespoons extra virgin olive oil
2 tablespoons black olive paste
2 tablespoons balsamic vinegar
1/2 teaspoon crushed red pepper flakes
1/2 teaspoon finely chopped fresh rosemary
2 tablespoons fresh basil leaves, finely shredded
1 garlic clove, coarsely chopped
Thick crusty bread (we used french bread from the deli)


Mix all ingredients together. Season to taste with pepper. Allow to marinate for at least 20 minutes, preferably longer.

Toast the bread or grill it for more dramatic presentation. Spoon mixture onto bread, drizzle with olive oil, and serve.

Now, if you can't find olive paste, as I couldn't, then I suggest buying a can of black olives. Drain the black olives of their liquid until there is about 1/4 of the can in liquid left. Put it in a food processor and give it a good blending. That should make you the paste you need. FYI- the paste you make will be a considerable amount more than you need. Store the rest in the fridge for another meal- I'm sure we can find a use for the extra.


Wild Rice Stuffing
Serves 6-8 (or more depending on the meal type)
Time: 20 minutes prep / 1 hr 25 min total

Ingredients
1 32 oz vegetable broth (recipe calls for chicken broth, I switched it out for veggie broth)
1 cup wild rice
1 1/4 c brown rice
1 stick unsalted butter
1 small yellow onion, finely chopped
3 stalks celery, finely chopped
1 cup fresh flat-leaf parsley, finely chopped
1/4 cup fresh sage, finely chopped
1 cup pecans, finely chopped
1 cup dried apricots or cranberries, roughly chopped (I use both- looks very pretty and tastes yummy!)
1/2 teaspoon black pepper

In advance: assemble the dressing, but do not bake it. Cover and refrigerate for up to 24 hours. Bake as directed, adding 10 minutes to the baking time. (This comes in handy if you want to make the dish the day prior to needing it.)

Heat oven to 350 degrees. In a pot, over medium-high heat, bring the broth and 2 cups water to a boil. Add the wild and brown rice, reduce heat to low and cover. Simmer until tender, about 45 minutes. Melt the butter in a large skillet over medium-low heat. Add the onion and celery and cook for 10 minutes. Add the cooked rice, parsley, safe, pecans, cranberries, apricots, pepper, and toss. Transfer to a buttered casserole dish. Cover and bake for 25 minutes.

*Note: The left over pecans, cranberries, and apricots make for a tasty trail mix for later in the week!

Double Layer Pumpkin Pie
Serves 10
Time: 20 minutes prep / Total Time: 4 hours and 20 minutes

Ingredients
4 oz (1/2 an 8 oz package) of cream cheese (softened)
1 cup plus 1 tablespoon milk, divided
1 tablespoon sugar
1 tub of cool whip topping, thawed, divided in half
2 graham cracker pie crusts (9 in)
15 oz can of Pumpkin
2 packages (4 serving each) Jello Vanilla flavor instant pudding and pie filling
1 teaspoon ground cinnamon
1/2 teaspoon ground ginger
1/2 teaspoon ground cloves

Mix cream cheese, 1 tablespoon milk, and the sugar in a large bowl until well blended. Gently stir in half of the whipped topping. Spread onto the bottom of the crust. (Will be thick)

Pour 1 cup of milk into a large bowl. Add pumpkin, dry pudding mixes, and spices. Beat with a wire whisk for 2 minutes or until well blended. (Mixture will be thick). Spread over cream cheese layer..

Refrigerate for 4 hours or until set. Dollop with remaining whipped topping. Store in refrigerator.

*Note- buy a second tub of cool whip for your pumpkin pie pieces! Yum!

Chickpea Bruschetta Photos:

Ingredients

Homemade black olive paste


Wild Rice Stuffing Photos:


Celery Before
Celery After


Onion Before

Onion After


Pecans Before

Pecans After


The rest of the ingredients
Apricots and Cranberries


Onions and Celery into the skillet
All that's left to add is the rice!

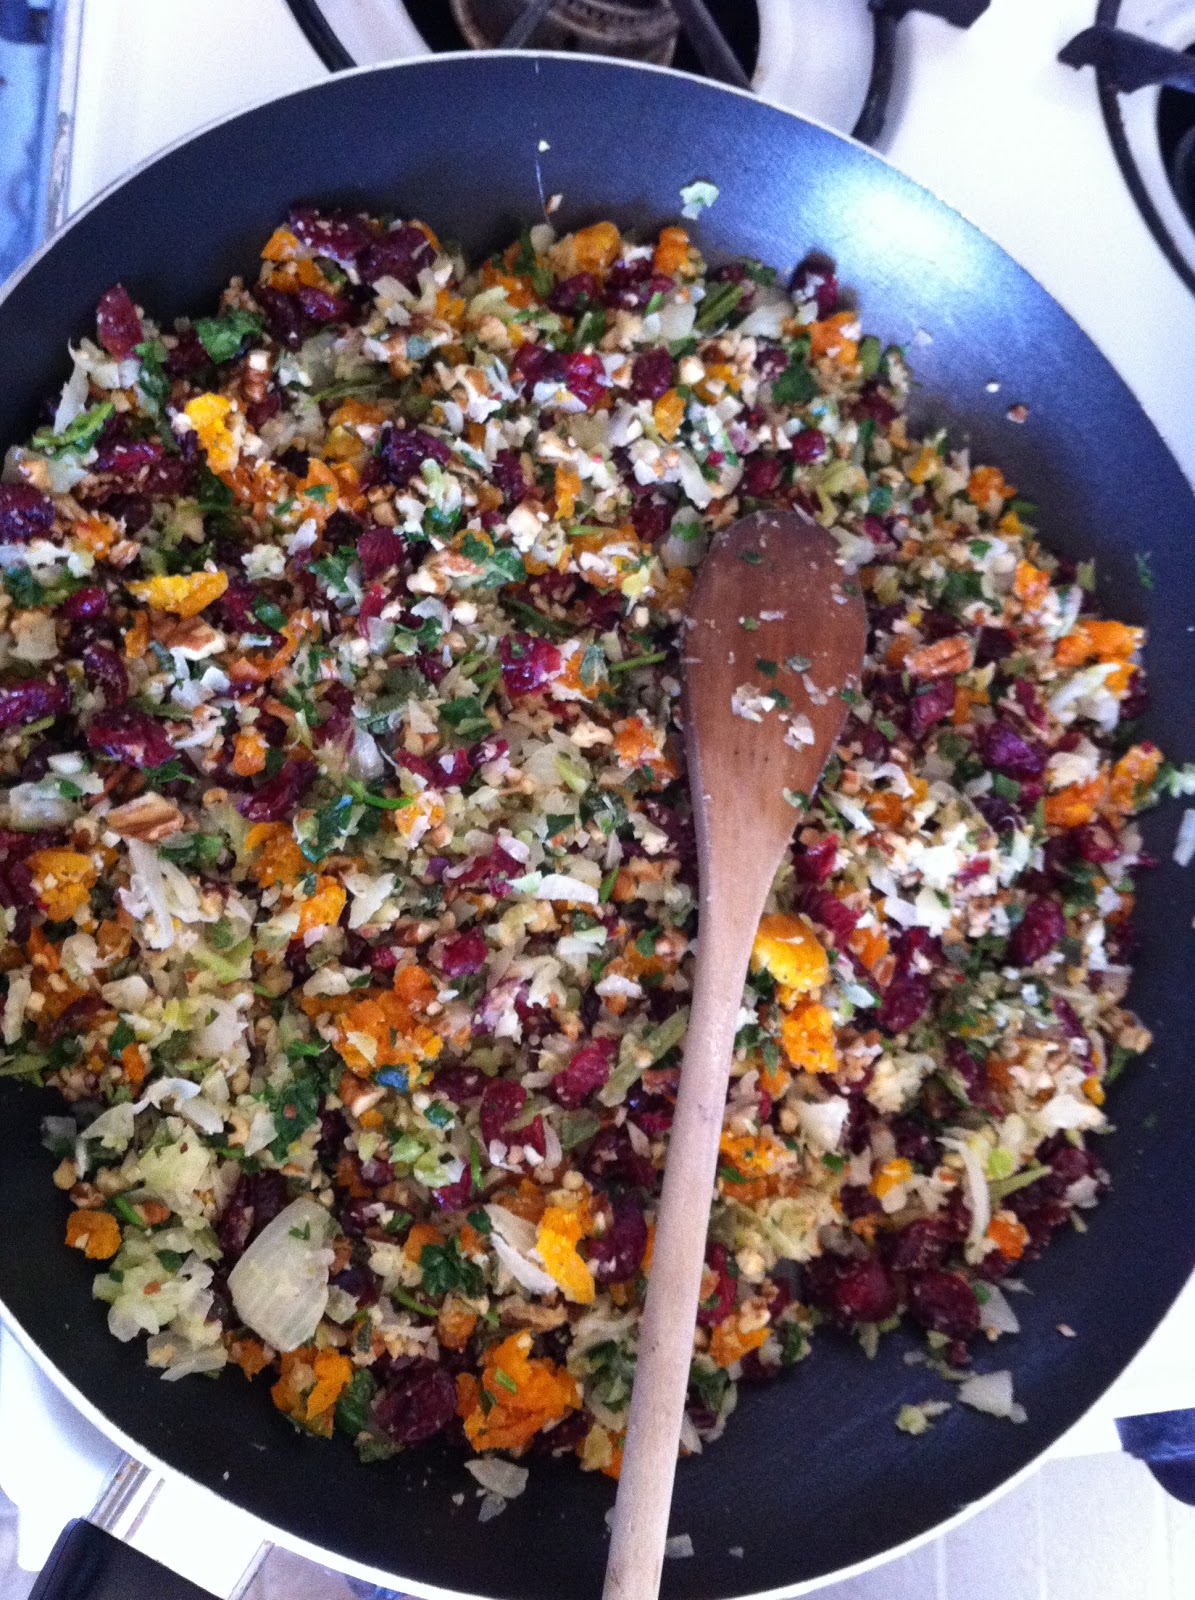
All set for the oven!

Left over ingredients Trail Mix!
Double Layer Pumpkin Pie Photos:
The cheesecake layer

Mixing the pumpkin mix.

All of these recipes were found online randomly throughout the years and I don't remember where I found them. I've made small adjustments as I have gone along such as using a rice medley that includes brown basmati rice, long grain red rice, wild rice, and sweet brown rice. It works out nicely and is a lot more cost effective than buying wild rice on its own.

Happy Thanksgiving!
~ Birdie

Monday, November 15, 2010

Pasta e Fagioli with Orzo

MMMMMMmmmmmmmm! I have been venturing into the world of soups, chowders, and chilis lately and have found some very tasty results. My most recent discovery? Pasta e Fagioli with Orzo. MMMMMMmmmmmm! It was quick to throw together, a total for 30 minutes of preparation time and that was it! It makes for a wonderful Fall dish too, the color alone screams Autumn. I found a recipe online and went shopping for ingredients... it wasn't until I got home and started to prepare it that I realized that the recipe was incomplete. I had to search for a similar one (thankfully the dish isn't too unique) and found a great complimentary recipe. So what ended up happening was the ingredients of the first recipe met the cooking method of the second. In the end, I was very pleased.

Pasta e Fagioli with Orzo:
  • 3 tbsp olive oil
  • 1 medium onion, chopped
  • 4 cloves garlic, chopped
  • 1 jalapeno, minced
  • 1 14.5 ounce can stewed tomatoes
  • 2 15.5 ounce cans cannellini beans, drained and rinsed
  • 6 cups vegetable broth
  • 1 8 ounce box orzo
  • 1 Rosemary Sprig
  • 1 Celery rib
  • 1 carrot sliced
  • 1/2 tsp Crushed red pepper
  • 1/4 cup chopped fresh Italian parsley
  • salt and freshly ground black pepper
  • Crumbled goat cheese
In a large saucepan, bring the stock to a boil. Add the orzo, cover partially and cook until the orzo is al dente, about 6 minutes. Strain the broth into a heatproof bowl. Reserve the orzo separately.

Wipe out the saucepan and heat the olive oil in it. Add the onion, carrot, celery, garlic, rosemary, crushed red pepper and cook over moderately high heat, stirring occasionally, until the vegetables are lightly browned, about 6 minutes. Add the stewed tomatoes (pureed in a food processor) and the strained broth, cover partially and simmer until the vegetables are tender, about 8 minutes. Discard the rosemary sprig.

Add half of the beans to the soup. Puree the soup in a processor and return to the saucepan. Add the remaining beans and the reserved orzo and cook until heated through. Season the soup with salt and pepper. Stir in the goat cheese and serve.

I cannot wait to can this meal. It is hearty, warm, and subtly delicious!

Autumn Greetings!
~ Birdie

Thursday, November 4, 2010

Garden Vegetable Soup

With a sink full of dishes, minimal counterspace, and a mass of canning jars on the shelf- it is time to get cooking!

Let me be the first to say: "I am not a cook." I am no Martha Stewart or Betty Crocker. BUT I do try and when I am successful it is worth celebrating. My Beau recently purchased me a pressure cooker so that I could begin canning our own soups, chilis, and other goodies and needless to say, I was excited! I had been making homemade vegetable soup from scratch for a few years now, but I always made too much for us to eat which lead to it being thrown away after about 8 days or so- one can only eat so much vegetable soup in a week! The pressure cooker was a great way to fix that. Now I can make a huge batch of soup, eat some for dinner, and can the rest! Forget the Progresso or Cambels soup on our shelves- we have only the best in our house!! I have included a rather vague recipe below to help anyone interested in creating their own- I apologize in advance, as I don't really have measurements- I go off of sight, not my measuring cups!

Organic Garden Vegetable Soup
2 Carrots
6 Red and Russet Potatoes (total)
1 lrg Heirloom tomatoes
1 bunch Cilantro
3 Bay Leaves
1 cup Peas
1 cup Corn
Garlic
Kidney Beans
3 stalks Celery
1 medium Yellow Onion
Broccoli
Kale (optional)
Rose Mary
Crushed Red Pepper
Pepper
(There is no need for salt, your vegetables will provide all the taste you need!)

  • Chop all vegetables into pieces smaller than bite size, but not minced. 
  • Fill large stew pot 2/3 full with water. Bring to a boil.
  • Place potatoes into the boiling water and continue to boil.
  • After about 10 minutes, add the other vegetables one at a time.
  • If using Kale, sautee in a pan first, then add small pieces to the soup.
  • Add garlic, bay leaves, other spices into the pot to taste.
  • Place a lid on the pot and let gently boil for 1 hour (if canning, boil for 20 minutes, then begin canning process- WARNING: Cilantro will be very hot to the touch. Do not get on skin.)
Viola! It's just that easy!

For those of you who are canning your left overs, I recommend using Ball Mason Jars or Kerr. Make sure your jars are crack free and don't have any sharp edges.

Place your jars and sealing lids in hot water. Ladel soup into the jars and tighten the lid on the jar. Place jar on the rack in the pressure cooker. Fill your pressure cooker with jars and seal the lid. My pressure cooker requires 10 PSI and 1 hour and 15 minutes of cooking. Check your pressure cooker's manual to see what it requires for the amount of water needed in the cooker to help with the pressure and how to tell when your cooker has reached it's appropriate pressure mark.

If you have any questions, leave a comment and I will be sure to answer it for you.

Happy Cooking,
~Birdie

Wednesday, April 21, 2010

Dehydrating Food in Your Oven

I ventured onto eHow again to see if there was a way to dehydrate food at home without having an actual food dehydrator. I remember when I was a kid my mom had brought home a food dehydrator and we used it to make out own banana and apple chips as well as dehydrate other snacky fruits and vegetables. It was a great way to make healthy snacks and the crunchiness of the pieces of fruits and veggies made for a great replacement of chips. Having read the instructions online I started out with some basic quick veggies: Snow Pea (in pod), Green Beans, and sliced Mushrooms. I placed them on two different cookie sheets- a single layer and no pieces touching. I preheated the oven, like instructed, to 150 degrees and put the cookie sheets in, being sure to leave the oven door propped over a little and have the ceiling fan going to circulate the air. I checked back 2 and a half hours later to a not so finished product. Being the impatient busy body that I am I promptly gave up the process and took the veggies out of the oven and put them into a bowl. They didn't look too beautiful, but they did taste pretty good- still a little moist though. In the end I realized... I need a food dehydrator. The amount of time I would need to keep my oven in use (sometimes 36-48 hours for some fruits) is just to great and I wouldn't be able to leave the house. Plus, I'm too impatient. Lesson learned and duly noted. Birdie is gonna get herself a high capacity food dehydrator. There was also a recipe on there about creating homemade fruit leather... definitely something worth trying as I love me some fruit leather!

Happy dehydrating,

~Birdie


PS- The mushrooms tasted the best.